Event Tracking
To Track Events Turn Event Tracking On.
Once you turn on Event Tracking make sure your Events are being sent through to Google Analytics.
- Go into the google analytics dashboard for the property & view that correlate with your tracking code & ID.
- Click “Real Time”
- Click “Events”
- Select “Events (Last 30 min)”
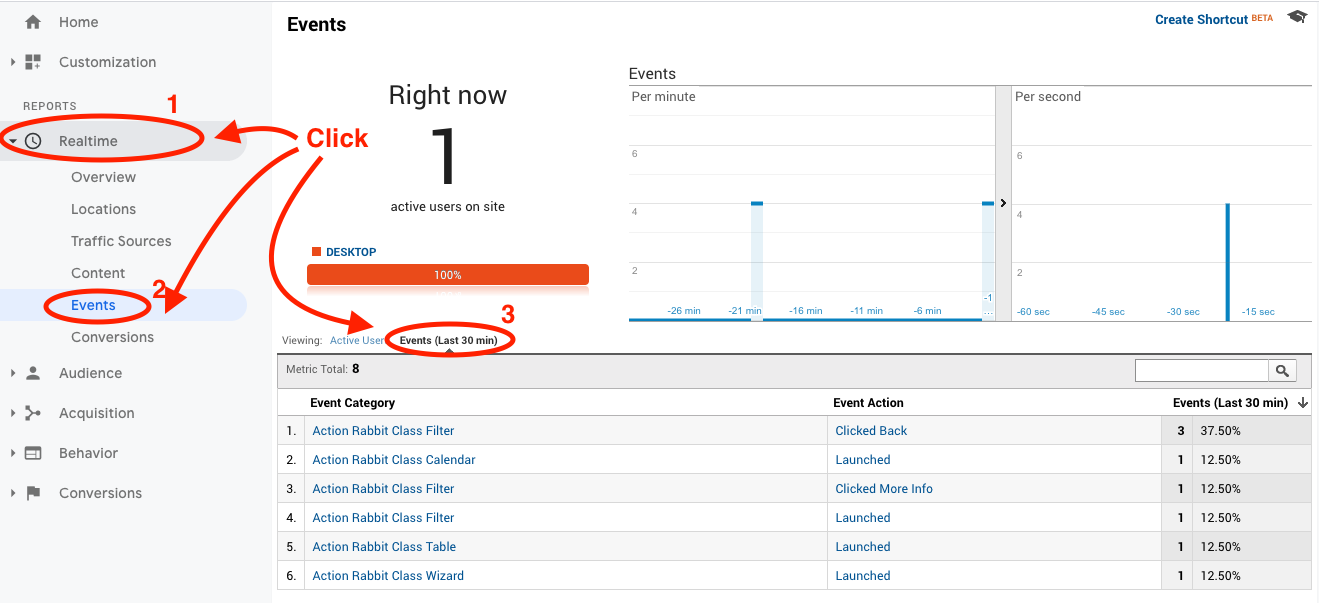
After you see the above screen, navigate to a page when you have included an Action Rabbit Tool (Class Filter, etc). Reload the page. Click on a location, register button, category, answer, etc. Wait for a few seconds and verify that the event is pushed through to your real time view. It should appear as a green bar when it first shows up.
Understanding Action Rabbit Events
Action Rabbit logs events to Google Analytics. Ok cool so what does that mean for me. That’s pretty neato because you can see what your users are doing with your Action Rabbit tools. If you are familiar with Google Analytics you can set up Goals to apply to the main analytics reports that you normally use. Since your primary goal is to drive traffic and engagement with Action Rabbit’s tools you want to see how they are working.
Action Rabbits Events:
- Launch – This is the first event launched for any of the tools Action Rabbit provides you. It is a non engagement (meaning that the user doesn’t need to click/scroll/tap/etc)
- Clicked Register – This is an event that fires when the user clicks the “Register Button” on Action Rabbit’s tools.
- Location Selected – This event is fired by the Class Filter when it detects more than one location and requires the user to select a location.
- Category Selected – This event is fired by the Class Filter when a user selects a category prior to being displayed classes.
- Displayed Classes – This event is fired by the Class Filter & Class Wizard when the user makes a selection that leads to displaying formatted classes.
- Toggled Instructor Filter – This event is fired by the Class Filter, Class Calendar, and Class Wizard when the Instructor Filter is opened & closed.
-
Filtered By Instructor – This event is fired by the Class Filter, Class Calendar, and Class Wizard when an instructor is clicked in the instructor filter.
-
Toggled Small Classes – This event is fired by the Class Filter, Class Calendar, and Class Wizard when the show small class filter is toggled.
- Answered Wizard Question – This event is fired when a user answers a question while using the class wizard.
- Wizard Recommended a Class – This event is fired by the Class Wizard when it recommends a class to the user.
- Clicked More Info – This event is fired by the Class Filter when the user clicks the “?” icon or the “More Info” button.
- Clicked Back – This event is fired by the Class Filter when a user clicks the “back” button.
- Registration Complete – This event is fired when the user has signed up for a class on the Jackrabbit Class web registration form and then been redirected back to your schools’ website confirmation page.
Of these events you will most likely want to set up a goal that correlates with the event “Registration Complete”.
The Registration Complete Event will capture the following:
- Event Category: The tool used to start the registration process (ie. Class Filter, Class Wizard, Class Calendar, Class Table)
- Event Label: The class name that the user clicked which sent them to the Jackrabbit Class Web registration form
- Value: The tuition fee of the class that the user clicked which sent them to the Jackrabbit Class Web registration form
For the Registration Complete Event to fire a Confirmation page must be set up on your site. And you need to tell Jackrabbit Class to send successful registrants to that page. The instructions on how to do that are in the eCommerce tracking documentation
Got somethin' to say?